5 steps to align and cut passport photo prints for UK applications
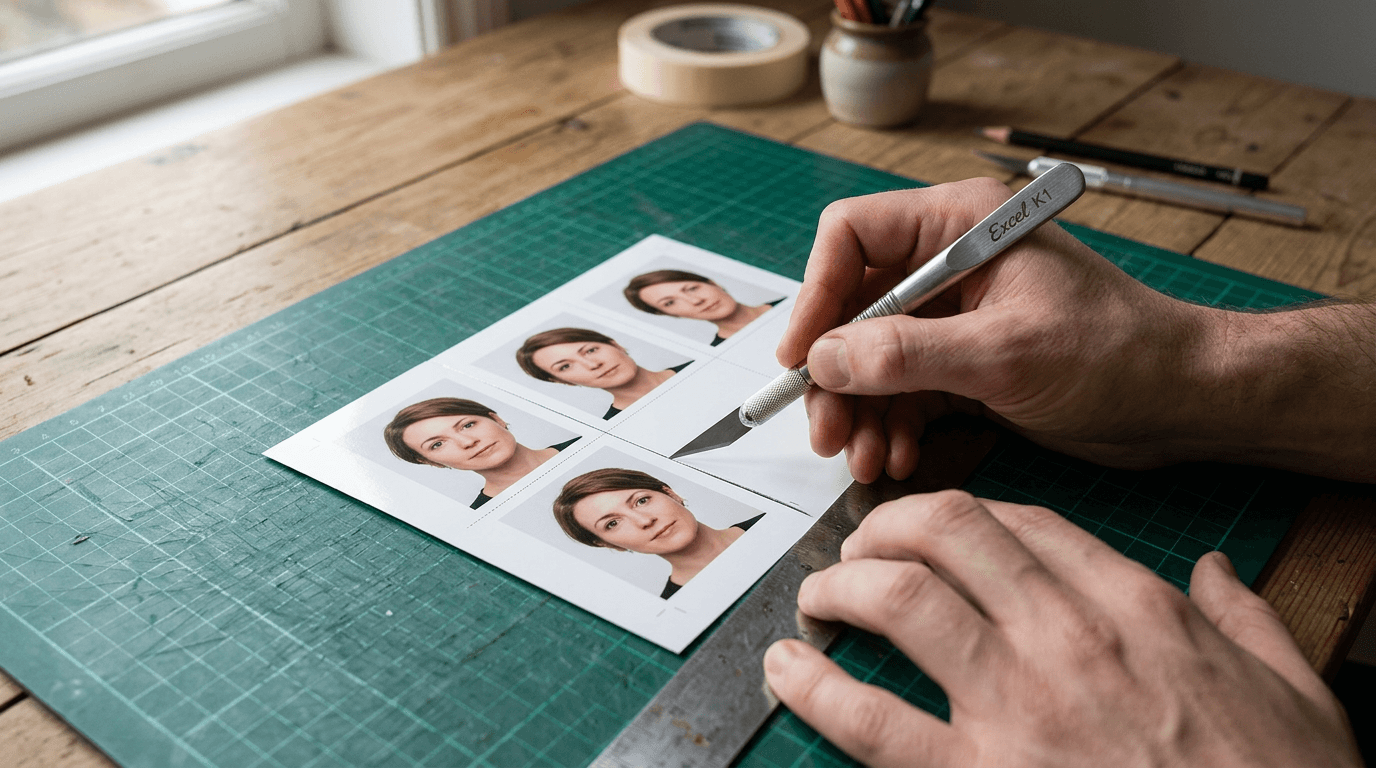
A physical trim that shaves a single millimetre off the required facial proportions is a leading cause of rejected travel documents. If you plan to print your own images at a local kiosk to avoid studio markups, knowing exactly how to format and cut passport photo prints is what prevents a multi-week processing delay for your application. The UK Her Majesty's Passport Office (HMPO) enforces strict biometric standards that apply not only to the digital image capture but equally to the final physical medium. A template printed on standard 4x6 inch paper leaves no room for guesswork with a pair of blunt household scissors. This guide breaks down the precise mechanics of formatting digital files, establishing print spacing, and separating biometric images mechanically without voiding their compliance.
Quick Summary
Properly preparing physical travel document images requires formatting a digital composite file to official UK dimensions before printing and subsequently separating the copies with precision tools. HMPO strictly demands a final, unmounted physical size of 45 millimetres high by 35 millimetres wide, delivered on high-quality photographic paper with zero surface damage resulting from the trimming process.
- Digital alignment must lock the chin-to-crown height strictly between 29mm and 34mm before any printing occurs.
- Standard 4x6 inch (10x15cm) print templates accommodate four compliant 45x35mm images perfectly with necessary bleed margins.
- Physical trimming must be executed with a heavy guillotine or a sharp craft scalpel, never standard pulling scissors.
- Torn paper fibres, edge creasing, or uneven borders instantly invalidate the submitted image for manual processing.
Table of Contents
- 1. Measure before you cut passport photo prints
- 2. Generate a 4x6 inch print template
- 3. Select compliant photographic paper
- 4. Execute the physical trim
- 5. Verify the physical biometric markers
- Common Pitfalls & Troubleshooting
- FAQ
- Recommended Reads
1. Measure before you cut passport photo prints
You cannot fix a poorly framed biometric image with a clever physical cut. The digital crop fundamentally dictates whether the physical photograph will pass official inspection. HMPO scanners expect the total physical boundary of the paper to be exactly 45mm high and 35mm wide. Inside that fixed physical frame, the subject's head - measured vertically from the lowest point of the chin to the uppermost crown of the head - must fall between 29mm and 34mm.
For infants and young babies, achieving this proportion is notoriously difficult because they possess much shorter necks and completely different head-to-torso ratios compared to adults. If the head occupies 36mm of vertical space on the digital canvas, you cannot simply trim the top of the physical photograph to fix it; doing so will truncate the crown of the head, resulting in an automatic rejection.
The blank background space above the subject's head is a highly monitored variable. HMPO requires a clear, unobstructed zone above the crown so that their facial recognition algorithms can accurately separate the subject from the plain light grey or cream background. Before you even send a file to a printer, you must map these pixel dimensions exactly. At the standard 300 DPI (dots per inch) required for photographic printing, a 45x35mm image requires a digital resolution of exactly 531 by 413 pixels. If your base file does not match these proportions exactly, any subsequent trimming will only amplify the error.
2. Generate a 4x6 inch print template
Commercial photo kiosks and home dye-sublimation printers operate on standard media sizes. Feeding a single 45x35mm piece of paper through standard hardware is mechanically impossible without jamming the intake rollers. To bypass this, you must composite four identical biometric images onto a standard 10x15cm (4x6 inch) digital canvas.

Once you receive your final passport photo download, ensure the file remains entirely uncompressed. Keep it in a standard RGB colour profile. Arrange the four distinct 45x35mm images on the 4x6 canvas. Leave at least a 5mm gutter between them. This blank white space provides a critical safety margin during the physical cutting phase. Never align the digital images completely flush. The slightest shift of your blade will leave a strip of the adjacent photo on your final print. This immediately renders both images non-compliant.
For applications involving young children, where maintaining strict alignment is already challenging, removing the guesswork from this layout stage is paramount. Relying on automated framing engines or referencing the UK and international baby passport photo requirements ensures your composite canvas respects the necessary guttering and exact millimetre dimensions, meaning your print will match the official template precisely when it emerges from the kiosk.
3. Select compliant photographic paper
HMPO strictly dictates the physical medium of the photograph because the application must pass through high-speed mechanical scanning hardware. Standard 80gsm A4 office paper lacks the rigidity required for these machines, while heavy fine-art mounting boards (above 300gsm) will routinely jam the intake feeders. You must select a medium-weight photographic stock, ideally sitting between 200gsm and 250gsm.
The surface finish dictates how light interacts with the image during the scanning process. You must print on a plain white gloss or standard satin finish. Heavily textured matte papers diffuse and scatter the scanner's intense light, which artificially reduces the contrast around critical biometric markers like the jawline, the edge of the pupil, and the bridge of the nose. If the scanner cannot detect crisp borders due to paper texture, the image is rejected for low clarity.
Furthermore, review the reverse side of the paper stock. While HMPO generally ignores faint, industry-standard watermarks (such as thin grey text indicating the manufacturer brand), dense, heavy black branding that bleeds through the paper and darkens the background of the image is not permitted. If you are printing at home and encounter hardware issues requiring you to abandon the batch, understanding the Terms & Conditions of your chosen software or paper supplier regarding ruined materials will dictate your next steps. Always buy dedicated photo stock, never general-purpose card.
4. Execute the physical trim
The mechanical separation of the prints is the point where the vast majority of DIY applications fail. HMPO explicitly rejects photographs presenting torn, creased, or jagged edges. A standard pair of household scissors works by crushing paper fibres between two relatively dull blades before severing them. This crushing action leaves a microscopic fray along the paper edge that catches in sorting machines and casts shadows under official scanners.
You must use a sharp craft knife (such as an industrial #11 scalpel blade) paired with a heavy steel ruler, or a dedicated, high-quality photographic guillotine. Place the 4x6 print flat on a self-healing cutting mat. Align your steel ruler precisely over the gutter margin. Crucially, place the bulk of the steel ruler over the actual face of the passport photo rather than the waste paper gutter.
Practical rule: Always anchor your steel ruler directly over the compliant 45x35mm image you intend to keep; if the blade slips during the cut, it will drift into the disposable gutter rather than ruining your final photograph.
Spread your fingers wide across the back of the steel ruler to distribute downward pressure evenly, preventing the glossy paper from slipping. Apply firm pressure to the scalpel and draw the blade across the paper in a single, continuous, decisive motion. Stopping and starting the cut mid-way creates minute physical steps in the edge profile, which appear as serrations under strict HMPO inspection. If you are unsure about the pressure required for 250gsm stock, consult the Help Center of your printer manufacturer regarding recommended cutting tools for dense media.
5. Verify the physical biometric markers
Once the individual photos are mechanically separated, you must independently verify both the external physical dimensions and the internal facial proportions before posting them. Do not assume the trimming process perfectly preserved the 45x35mm boundary.
Lay the freshly cut print flat on a well-lit table and measure the width and height with a clear, rigid plastic ruler. Looking from directly above prevents parallax error, where the thickness of the photo paper makes the measurement appear slightly shifted. The external dimensions must be exactly 45mm by 35mm. Next, measure the vertical span from the lowest point of the chin to the top of the head (excluding hair). This must fall strictly between 29mm and 34mm. For infants with little to no hair, finding the exact crown requires estimating the physical curvature of the skull line.
Finally, inspect the glossy surface under harsh light for any oils, smudges, or micro-scratches introduced by your fingers or the metal ruler during the trimming phase. While utilizing a digital platform provides assurance regarding digital layout - often backed by a 100% Refund Policy if an algorithm fails - no service can safeguard against physical damage inflicted after the file is delivered. Ensure the edges are entirely flush, straight, and completely free of any remaining white borders.
Common Pitfalls & Troubleshooting
The head size shrinks after printing
- Symptom: The overall trimmed photo measures 45x35mm correctly, but the chin-to-crown measurement drops down to 26mm or 27mm.
- Diagnosis: The local print software, kiosk terminal, or your home printer driver automatically applied a "shrink to fit" or "scale to media" setting. This aggressively reduces the entire image by 3-5% to ensure it fits within the hardware's unprintable margins.
- Fix: Always bypass default printer formatting. In the print dialogue box, you must force the scale setting to exactly 100% or explicitly select "Actual Size". Never allow borderless printing on a composite biometric template.
Jagged or frayed paper edges
- Symptom: The borders of the trimmed photo feel rough to the touch, and tiny white paper fibres are clearly visible protruding along the cut line.
- Diagnosis: You used blunt scissors or a severely unsharpened rotary trimmer, which pulled and tore the paper substrate rather than cleanly slicing it. This is the most common real-world cause of physical document rejection.
- Fix: Abandon the damaged print immediately. Switch to a fresh scalpel blade and a steel ruler on a firm cutting mat. Score the paper deeply rather than attempting to chop vertically through it.
Gloss smudging around the cut line
- Symptom: Dark ink transfer, permanent fingerprint marks, or dull patches appear near the freshly cut borders of the image.
- Diagnosis: Handling the printed surface before the ink fully cured, or using a dirty steel ruler that deposited residue directly onto the gloss during the trimming process.
- Fix: If using a home inkjet printer, allow the 4x6 sheet to dry undisturbed for a minimum of ten minutes before applying the ruler. Handle the photograph exclusively by the extreme outer edges of the waste margin prior to the final cut.
Curled paper skewing the cutting line
- Symptom: The final cut curves inward slightly, resulting in a photo that is 34mm wide in the centre but 35mm wide at the corners.
- Diagnosis: High ambient humidity or roller memory from the printer caused the paper stock to bow upward, meaning the steel ruler shifted slightly during the drag of the blade.
- Fix: Flatten the 4x6 printed sheet completely under a heavy book for one hour before attempting to apply the blade.
FAQ
Do I need to sign the back of the photo before cutting it? If your application requires a countersignatory (which is mandatory for first-time baby passports), they must sign the back of one specific photo. It is significantly easier and safer to have them sign the back of the individual 45x35mm print after it has been fully trimmed. Doing it beforehand risks the ink crossing the eventual cut line, which can smear into the paper fibres.
Can I use a paper trimmer with a rotary blade? Yes, provided the circular blade is newly replaced and specifically designed for heavy photographic stock. Rotary trimmers provide a highly straight edge, but a dull rotary blade will crush the edge of 250gsm paper rather than slicing it, leading directly to a rejected application.
What happens if I trim the photo slightly smaller than 45x35mm? HMPO will reject the image. The 45x35mm external boundary is an absolute, hard requirement for the physical document scanners to grip and process the medium. If you accidentally shave a millimetre off the side, discard that print and cut a fresh one from your 4x6 template.
Should I leave a white border around the image? Absolutely not. The 45x35mm measurement must consist entirely of the grey or cream background and the subject. Any white border left on the print acts as an incorrect bounding box for the facial recognition software and guarantees a rejection.
How should I store the cut prints before posting? Place the loose, separated prints inside a clean, unsealed paper envelope before putting them into your main application package. Never attach them to the application form with paperclips, staples, or adhesive tape, as this physically damages the biometric surface and renders the photo useless.