Decoding the 2x2 passport photo: Sizing Mechanics and Biometric Failures
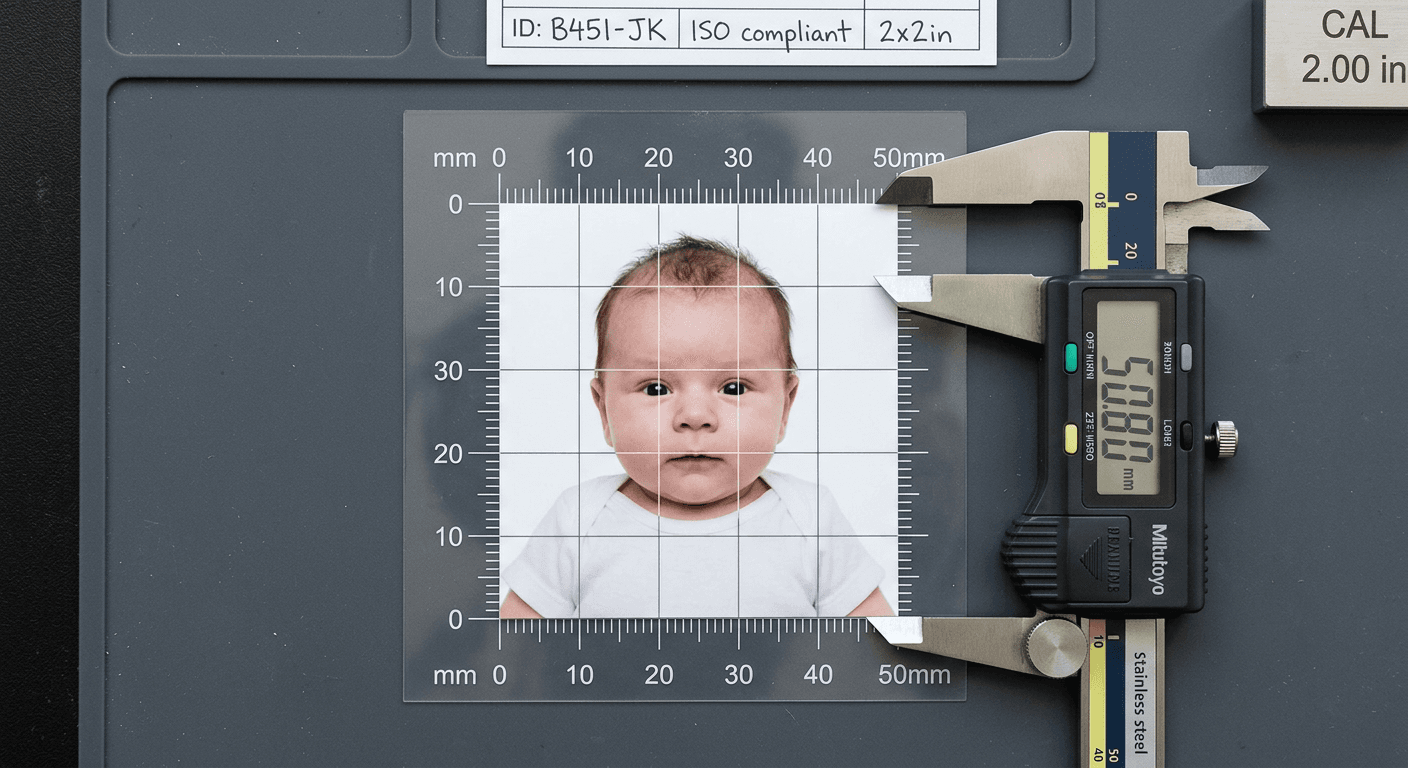
An applicant waits four weeks for a government processing centre to review their submission, only to receive a rejection notice stating the head size in their image is two millimetres too large. The physical print was exactly the correct outer dimension, but the internal geometry failed the biometric overlay test. A 2x2 passport photo is not merely a square piece of paper; it is a rigid coordinate system where the placement of the eyes, chin, and crown must align with fixed technical parameters. When users attempt to format or print these files at home, the transition from digital pixels to physical millimetres is where the majority of applications fail.
Quick Summary
A compliant government photo requires exact adherence to outer dimensions, internal head-to-chin ratios, and background lighting standards. Failing to match the required specifications results in automated application rejections.
- Outer dimensions strictly dictate the cut size (e.g., 51x51 mm), but the internal head size must fall within a precise 25-35 mm window.
- Printing formats often automatically rescale images, turning a compliant digital file into a non-compliant physical print.
- Infant photography requires specific compensation for posture, as a lack of neck definition alters where the chin line is measured.
- Background removal tools often leave jagged edge artefacts that trigger biometric validation failures.
Table of Contents
- The Geometry Behind the 2x2 passport photo
- Where the us passport photo size Causes Rejections
- Infant Photography: Scaling and Posture Limits
- Interpreting american passport photos requirements for Backgrounds
- Comparing International Sizing Specifications
- Digital Validation and Compression Thresholds
- FAQ
- Recommended Reads
The Geometry Behind the 2x2 passport photo
The outer boundary of a 2x2 passport photo measures exactly 51x51 millimetres. However, achieving this outer square is the simplest part of the formatting process. Government processing facilities use transparent physical overlays or digital bounding boxes to verify the internal geometry of the subject's face. If the facial features do not land inside these designated zones, the photo is rejected regardless of its clarity.
The most critical internal metric is the head-to-chin ratio. In a standard 51x51 mm frame, the distance from the bottom of the chin to the top of the head (excluding hair) must measure between 1 inch and 1 3/8 inches (25 mm to 35 mm). This leaves exactly 16 to 26 millimetres of available negative space, which must be distributed precisely. The subject's eyes must sit between 1 1/8 inches and 1 3/8 inches (28 mm to 35 mm) from the bottom edge of the photo.
When a photo is cropped, moving the bounding box a few millimetres too high places the eyes above the required line. Moving the camera slightly too close during capture expands the head beyond the 35 mm maximum limit. Digital sensors map these distances by calculating pixel density. At the standard minimum resolution of 300 Dots Per Inch (DPI), 51 millimetres equates to 600 pixels. Therefore, the 25 mm minimum head size translates to exactly 295 pixels on a digital sensor. If the face occupies 400 pixels in a 600x600 image, the applicant will receive a rejection for improper scaling.
Practical rule: Never crop a photo by guessing the centre. Always place the bottom edge of the chin first, measure up 25-35 millimetres for the crown, and let the outer 51x51 mm box fall where it needs to around those fixed points.
Where the us passport photo size Causes Rejections
Applicants residing in the United Kingdom or Europe face a specific mechanical barrier when applying for American documents: the standard local printing infrastructure is designed for a completely different shape. The standard UK and Schengen visa photo measures 45x35 millimetres - a rectangle. The us passport photo size is a 51x51 millimetre square.
This discrepancy creates failures at retail printing kiosks. When a user takes a compliant 51x51 mm digital file to a high street pharmacy or supermarket kiosk and selects the "passport photo" option, the kiosk's software automatically attempts to fit the image into its default 45x35 mm template. The machine will either compress the square into a rectangle, severely distorting the applicant's facial proportions, or it will crop the sides off the square, cutting off the applicant's ears and shoulders.
To physically print a square format in a market dominated by rectangular standards, the user must bypass the kiosk's passport software entirely. The correct mechanism is to construct a digital 4x6 inch (10x15 centimetre) composite image beforehand. A standard 4x6 print is exactly 1200x1800 pixels at 300 DPI. By placing two 600x600 pixel (2x2 inch) squares side-by-side onto a white 1200x1800 pixel digital canvas, the file can be printed as a standard landscape photograph. The kiosk will print the 4x6 image without scaling it, allowing the applicant to physically cut out the two 51x51 mm squares with scissors. This method also aligns with standard retail photo rates, which typically cost between 10 and 15 pence per 4x6 sheet, avoiding the automatic markup applied to "passport" printing services.
Infant Photography: Scaling and Posture Limits
Formatting a government-compliant photo for an infant introduces anatomical variables that automated cropping tools often misinterpret. The primary issue is measuring the chin. Adults have a defined jawline and neck, providing a clear terminal point for the head-size measurement. Infants, particularly newborns, lack this neck definition and frequently possess multiple chin folds, making it difficult for standard algorithms to determine where the head ends and the torso begins.
When photographing an infant lying on their back, gravity pulls the facial tissue backwards, further obscuring the jawline. If a cropping algorithm measures from the bottom of the lowest visible fold instead of the actual structural chin, it will calculate the head size as larger than it actually is. This forces the software to shrink the entire image to compensate, resulting in a head that is technically too small for the biometric overlay.
The second mechanical limit is posture. Biometric standards require the subject to face the camera directly with squared shoulders. When an infant is placed in a car seat or on a flat sheet, their shoulders rarely sit perfectly horizontal. If the parent rotates the photograph digitally so the eyes are level, the shoulders will appear tilted in the final frame. While slight shoulder tilt is sometimes forgiven for newborns, extreme rotation makes it obvious that the image was digitally manipulated, which is grounds for immediate rejection.
Checking a provider's 100% Refund Policy is a necessary step when navigating infant biometrics, as the physical limitations of photographing a newborn mean that even professionally edited images carry a higher statistical risk of manual rejection by strict consular officers.
Interpreting american passport photos requirements for Backgrounds
The requirement for a "plain white or off-white background" is consistently misunderstood as a colour requirement when it is actually a lighting requirement. The american passport photos requirements dictate that the background must be free of shadows, patterns, and texture. A white bedsheet used for an infant photograph is technically white, but the creases in the fabric create grey shadows that digital validation algorithms read as texture.
To bypass physical background limitations, many applicants use automated background removal software. These AI tools use edge-detection to mask the subject and replace the background with pure digital white (RGB value 255, 255, 255). However, this creates a distinct failure mode: the clipping halo.
When edge-detection software isolates a head, it struggles with the semi-transparent pixels surrounding hair. Rather than smoothly blending the hair into the new background, poorly configured software will either cut off wisps of hair (altering the natural shape of the head) or leave a jagged border of the original room's colour around the applicant's ears and neck.
Government validation tools run contrast analysis on the edges of the silhouette. If the transition between the head and the pure white background happens in a single pixel without natural optical blurring, the software flags the image as "digitally altered". Official guidelines explicitly state that digitally altering the applicant's appearance or the background to artificially remove shadows is prohibited.
Practical rule: Zoom in on your digital file to 300% magnification around the curve of the ear or the edge of the hair. If you see a sharp staircase of pixels or a grey outline separating the subject from the white background, the image will likely fail contrast validation.
Comparing International Sizing Specifications
Assuming all international documents use the same photo standard is a frequent cause of processing delays. Visas, citizenship applications, and passports each draw from different regional biometric databases. Reviewing a dedicated UK & International Baby Passport Photo Requirements & Guides index reveals how subtly these geometry rules diverge.
| Jurisdiction | Outer Dimensions | Minimum Head Size | Maximum Head Size | Background Colour |
|---|---|---|---|---|
| US Standard | 51x51 mm (2x2") | 25 mm (1") | 35 mm (1 3/8") | Plain White / Off-White |
| UK Standard | 45x35 mm | 29 mm | 34 mm | Cream or Light Grey |
| Schengen Visa | 45x35 mm | 32 mm | 36 mm | Light Grey / Light Blue |
| Canadian Visa | 45x35 mm | 31 mm | 36 mm | White or Light Colour |
The most notable friction point in this table is the background colour. The UK explicitly forbids pure white backgrounds, requiring cream or light grey to ensure a contrast boundary between the subject's face and the paper it is printed on. Submitting an image formatted with an American pure-white background to a UK authority will trigger a rejection for lack of contrast.
Digital Validation and Compression Thresholds
When applying online, the physical dimensions of the photo are replaced by digital constraints. A compliant file must survive the upload portal's automated screening tool before a human ever reviews it. These tools assess three primary technical factors: colour space, file size, and compression artefacts.
The required colour space is sRGB. Smartphones often default to capturing images in Display P3 or other wide-gamut colour spaces designed for HDR screens. When a Display P3 image is uploaded to a government portal expecting sRGB, the colour mapping breaks. Skin tones instantly shift to an unnatural red or yellow, which violates the requirement that the photo accurately represent the applicant's natural skin tone.
File size limits create a conflict with resolution limits. A standard digital portal requires an image to be exactly 600x600 pixels (or up to 1200x1200 pixels) but frequently caps the allowable file size at 240 kilobytes. Uncompressed images at this resolution easily exceed 1 megabyte. To meet the size limit, the file must be compressed using the JPEG format.
Aggressive JPEG compression groups similar pixels together into 8x8 blocks to save space. When an image is compressed too heavily to meet the 240 kB limit, these blocks become visible across the subject's face, creating a grid-like texture known as compression artefacts. Biometric software cannot scan the iris or map the distance between facial features if the pixels around the eyes have been blurred into a single block by high-ratio JPEG compression.
The correct approach is to start with a high-resolution file, scale it down to exactly 600x600 pixels first, and then apply minimal JPEG compression (usually around 85% to 90% quality). This sequence reduces the file size through structural shrinking rather than algorithmic crushing, preserving the pixel integrity required for facial recognition software to function.
FAQ
Can I print a US-sized photo on standard UK A4 photo paper? Yes, but you must manually configure the printing software to output the image at exactly 51x51 mm without scaling to fit the page. Printing multiple 51x51 mm images on a single 4x6 inch template and then printing that template on A4 is often a more reliable way to maintain the correct dimensions.
Why does my digital photo look blurry after I crop it to 600x600 pixels? If you started with an image taken from too far away, cropping the head to fill the required space means you are discarding the majority of the original pixels. Stretching a small number of remaining pixels to fit a 600x600 canvas causes interpolation blurring. The camera must be close enough during capture to ensure the face occupies sufficient resolution.
Do infants need to have their eyes open for a compliant photo? Newborns (typically under six months) are generally exempt from the open-eye requirement, provided the rest of the facial geometry is visible. However, older infants and toddlers must have both eyes open and looking directly at the camera.
What causes a shadow rejection if I am using a pure white wall? A white wall only appears white to a camera if it is evenly lit. If the primary light source is in front of the applicant, their body will cast a hard shadow on the wall behind them. You must light the background separately or position the applicant far enough away from the wall to prevent shadow casting.
How do I check if my digital file is in the correct sRGB colour space? On Windows, right-click the image, select Properties, and view the Details tab under 'Color representation'. On macOS, open the image in Preview, press Command+I to open the Inspector, and look for 'Color space'.